Search for DIY crawl space encapsulation and you will find plenty of videos that make it look like a weekend project. Roll out some plastic, tape the seams, close the vents, plug in a dehumidifier, and you are done. Then the seams start lifting, the musty smell comes back, or water collects on top of the new liner, and the homeowner can end up paying to tear it out and start over.
Encapsulation is not one product. It is a system, and every crawl space needs its own version of it. Drainage, dehumidifier sizing, materials, and the way everything is sealed and fastened all depend on the crawl space in front of you. Our team at Level Home Foundation Repair encapsulates crawl spaces across Tulsa and northeast Oklahoma, and this guide walks through what a correct installation involves, the steps DIY jobs tend to skip, and the questions to ask before anyone seals up the space under your home.
What the Photo Shows: The Prep Work Many People Skip
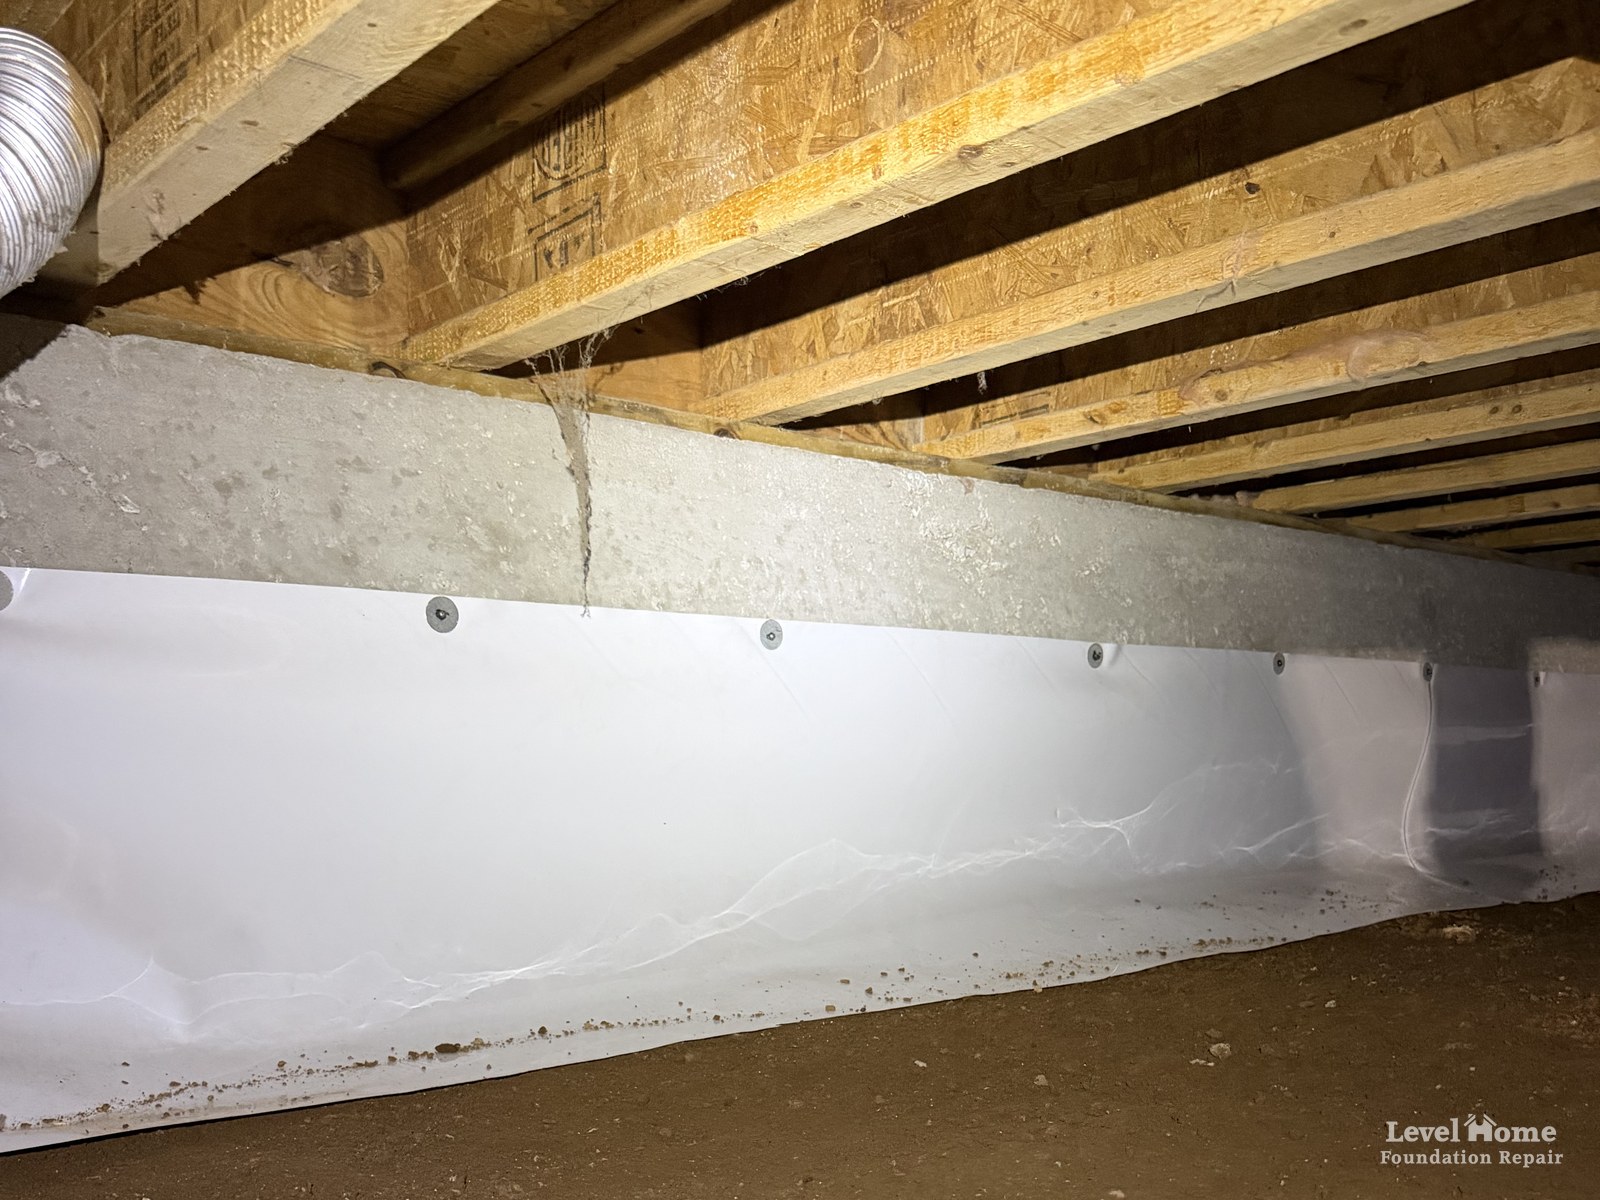
The photo at the top of this post was taken partway through one of our encapsulation jobs. Only three things have happened so far. The crawl space has been cleaned out, the dirt floor has been raked flat, and the white wall liner has been installed and fastened to the foundation wall along its top edge. On any encapsulation, the rest of the system is built on top of this prep.
None of that is exciting, and it is exactly the work many people skip when they are following a video. Here is why each step matters.
Clearing the debris
Old plastic, scrap wood, fallen insulation, rocks, and trash all have to come out. Wood scraps and cardboard give mold something to feed on, and the model building code already requires the ground under a home to be cleaned of vegetation and organic material (International Residential Code, Section R408.5). Advanced Energy, a North Carolina nonprofit that has field tested closed crawl space designs, also says old vapor retarder should be removed before new material goes in so water and debris are not trapped underneath.
Raking the ground flat
A crawl space liner can only seal as well as the ground under it allows. Ridges, ruts, and bumps hold the liner up off the soil, so seams cannot be pressed flat and sealed, and those high spots get rubbed and worn every time someone crawls through. Low spots collect water. A U.S. Department of Energy Building America guide on closing crawl spaces calls for removing rubble and sharp stones that could puncture the new barrier, filling low spots, and smoothing the ground for an even application (Guide to Closing and Conditioning Ventilated Crawlspaces). Advanced Energy reports that tape joints failed in its research houses when surfaces were not clean or the joints were under mechanical stress. A clean, flat surface is how you avoid both.
Installing and fastening the wall liner
The wall liner goes up first so the floor liner can overlap it and seal to it. In the photo you can see the row of fasteners holding the liner to the wall, and that detail matters. ENERGY STAR guidance on closed crawl spaces recommends mechanically fastening the liner to the perimeter wall in addition to sealing it, because adhesives, sealants, or tapes alone may be insufficient to support the material (ENERGY STAR quick reference on closed crawl spaces). When tape is the only thing carrying the weight of a wall liner, it can let go, and once it does the seal is gone.
Why DIY Crawl Space Encapsulation Is Harder Than It Looks
The videos are not wrong about the basic parts. A finished system usually includes a liner on the ground and walls, sealed seams, closed vents and openings, and some way to keep the air dry. What a video cannot show is how those parts have to be chosen and fitted to one specific crawl space.
Advanced Energy sorts the dozens of components in a complete closed crawl space into six categories: moisture management, pest control, combustion safety, thermal insulation, fire safety, and radon safety (Advanced Energy crawl space guides). A roll of plastic covers part of one of those six.
The Department of Energy guide is blunter. It says turning a vented crawl space into a sealed, dry one “requires more than just sealing off the vent openings,” and that simply sealing the vents without considering the other details “could make the situation worse, increasing the levels of moisture and potentially creating a deadly situation if naturally ventilated types of combustion equipment are located in the crawlspace.”
Every crawl space is different, too. Two houses on the same street can have different soil moisture, different drainage, different heights and access, ducts or no ducts, a gas water heater or none, and sound framing or rotted sill plates. That is why our team plans each encapsulation around the space itself instead of around a kit size.
How to Encapsulate a Crawl Space the Right Way
Here is the general order a correct installation follows and the decisions that come up at each stage. The details change from house to house, which is exactly the point.
1. Check the structure, the water, the mold, and anything that burns fuel
Before anything gets covered, the crawl space needs a real inspection. Is the framing sound, or are there sagging floors, rotted sill plates, or failing crawl space piers? Where is the moisture coming from: rain draining toward the house, groundwater, a plumbing leak, a sweating duct, or humid air pouring in through the vents? Is there mold that has to be cleaned up first? Are there gas appliances that depend on outside air from those vents?
Structural problems come first. Covering a failing pier or a rotted joist with a liner only hides it, which is why Level Home does not sell encapsulation as a standalone fix when the real problem is structural. When framing needs repair, our crawl space structural repair work is done before any liner goes down. If moisture has already damaged the wood, our post on what crawl space moisture does to floor joists explains how that happens and how we rebuild it, and our list of warning signs of crawl space structural damage covers what to look for upstairs.
Mold gets the same treatment. The EPA’s advice is not to paint or caulk over moldy surfaces but to clean them and dry them first (EPA mold cleanup guidance), and its brief guide to mold and moisture puts it simply: “The key to mold control is moisture control.” A liner laid over a mold problem does not solve it.
Fuel burning equipment is a safety check, not an afterthought. The Department of Energy guide calls combustion safety a critical first step and notes that natural draft appliances that depend on combustion air from open foundation vents will need equipment upgrades or changes to how they get that air before the vents are closed.
2. Solve drainage before anything is sealed
A liner controls moisture vapor. It does not stop liquid water. If water runs into the crawl space during storms or seeps through the walls, sealing the space without a way to move that water out just hides a puddle under plastic.
Drainage starts outside, with gutters and downspouts that carry roof water away and ground that slopes away from the foundation. Our guides to French drains and surface drains and perimeter drainage during heavy rain cover those exterior fixes. Inside, the question is whether the crawl space needs an interior drain and a sump pump. ENERGY STAR guidance calls for grading the crawl space floor toward one or more low points with drains or sump pumps at the lowest points, and the building code has its own drainage rules for sites where groundwater can rise close to the floor (Section R408.6). Making that call means reading the site: the soil, the slope, the downspout layout, and the water stains or silt lines that show where water has already been.
Level Home installs crawl space drainage systems, and when a crawl space needs one, it goes in before the liner so the two work together. Tulsa’s clay soil and spring storm season make this a big step for a lot of local homes. The same planning goes into a professional yard drainage installation, and you can see the full range of options on our foundation drainage systems page.
3. Clean, clear, and rake the ground
This is the stage in our photo: debris out, old plastic out, sharp rocks gone, low spots filled, and the dirt raked smooth so the floor liner lies flat with no ridges or bumps. If the floor is being graded toward a drain or sump, that slope is set now too. When this step gets rushed, it shows up later as worn spots, punctures, and seams that will not stay sealed.
4. Choose materials for the crawl space, not the price tag
The building code sets a minimum, not a target. For an unvented crawl space, the International Residential Code requires exposed earth to be covered with a continuous Class I vapor retarder, the least permeable class, with joints overlapped 6 inches and sealed or taped, and edges carried at least 6 inches up the wall and attached and sealed there (Section R408.3).
Thin plastic can meet that rule on paper and still fail in practice. ENERGY STAR notes that thicker, reinforced polyethylene is more durable, and Advanced Energy suggests thicker, reinforced material for durability and puncture resistance, especially in storage areas and along service paths to equipment such as an air handler. Good crawl space vapor barrier installation, or moisture barrier installation as some contractors call it, starts with a liner chosen for how that crawl space will be used and serviced. The same goes for the fasteners, the seam tape or mastic, and any wall insulation. ENERGY STAR says tapes and sealants should be products the liner manufacturer accepts for use and that will perform over the long run. Tape that was never meant for the liner may hold at first and let go later.
5. Seal and secure everything for real
This is where experience shows. A sealed system is only as good as its weakest seam or edge, so every one of these details has to be done right:
- The wall liner is mechanically fastened and sealed at the top, not just taped.
- The floor liner overlaps the wall liner and every other seam, and the seams are sealed. The code minimum overlap is 6 inches, and Advanced Energy recommends at least 12.
- Piers and support columns are wrapped, with the liner carried up each one. ENERGY STAR calls for at least 4 inches above the floor.
- The floor liner is secured so it does not shift or tear as people move through the space.
- Foundation vents, the access door, and the openings around pipes, wires, and ducts are air sealed so humid outdoor air stays out.
- A band of bare wall is left at the top for termite inspection where needed. ENERGY STAR recommends at least a 3 inch gap between the top of the wall liner and the top of the wall, and suggests checking with your pest control company so the system does not interfere with their treatment or warranty.
Insulation needs the same care. The Department of Energy guide tells installers to take extreme precautions when insulating the band joist area and to assess the moisture potential first, and Advanced Energy says it is not acceptable to drape liner or insulation from the band joist or sill plate down to the floor because it blocks termite inspection.
6. Size the crawl space dehumidifier with math, not a guess
Sealing the crawl space is only half the job. Building scientist Joseph Lstiburek put it plainly: “folks tend to forget this part.” Once a crawl space is closed, you have to provide air exchange with the house or provide dehumidification (Building Science Corporation, BSI 115). The building code lists a few options for unvented crawl spaces, including conditioned supply air and dehumidification sized to the manufacturer’s specifications.
Dehumidifier sizing is easy to get wrong, and the labels do not help. In June 2019 the federal test for portable dehumidifiers moved from 80°F to 65°F, so newer units report smaller capacities than older units tested the old way. ENERGY STAR’s comparison table shows a portable unit rated at 70 pints a day under the old test lands at roughly 40 to 45 pints under the new one (ENERGY STAR dehumidifier testing and capacity). Mixing old and new ratings is an easy way to end up with the wrong size unit, so a pints per day number has to be read against the test it came from. ENERGY STAR itself says a whole home dehumidifier should be sized and installed correctly by a professional.
When our team sizes a dehumidifier for an encapsulated crawl space, we look at the square footage and height of the space, how tight it will be once it is sealed, how much moisture is still coming from the soil and walls, whether ductwork or equipment sits in the crawl space, and how the unit will drain. The goal is to keep crawl space humidity below 60 percent, the indoor humidity limit the EPA recommends to help control mold (EPA guide to mold and moisture), with a unit that is not running nonstop just to keep up.
How the dehumidifier drains matters as much as its size. Advanced Energy recommends running appliance condensate lines directly outside or to an interior pump rather than into a crawl space drain, and adding an auxiliary drain pan with a float shutoff under dehumidifiers and air handlers in a closed crawl space as a backup if a line clogs.
7. Dry it down at the right pace, then check the numbers
A crawl space that has been damp for years does not need to be dried overnight. The Department of Energy guide notes that rapid, excessive drying can cause cosmetic damage to wood finishes in the living space above, so in some homes it suggests closing the crawl space gradually. Once the system is running, the humidity readings show whether it is working. ENERGY STAR notes that experienced installers usually offer quality checks such as a humidity monitor or a water alarm so problems get caught early.
What Goes Wrong When Steps Get Skipped
Most crawl space encapsulation problems trace back to one of the steps above. When a crawl space has been sealed without the right planning, these are the issues that tend to show up:
- Water trapped under the plastic. A liner laid over wet ground, standing water, or old plastic gives that water nowhere to go.
- Seams and edges that let go. Tape on dusty surfaces, tape stretched over a ridge, or tape the liner maker never approved.
- A wall liner hanging by tape. Without mechanical fasteners, the weight of the liner pulls on the seal every day.
- Liner draped from the sill plate. It hides the wall and the wood framing from a termite inspector.
- Vents closed with nothing drying the air. A closed crawl space still needs conditioned air or a dehumidifier.
- A dehumidifier that is too small or drains to the wrong place. Sized from an old rule of thumb, or dumping condensate where it causes new trouble.
- Gas appliances starved of combustion air. The most serious one, and the reason fuel burning equipment gets checked first.
- Mold or rotted wood covered up. The damage keeps going under a liner that makes it harder to see.
Fixing these often means pulling up the old material, correcting what was missed, and installing the system again, which costs more than doing it right once. It is the same lesson our post on the dangers of DIY foundation repair covers for structural work, and many of the crawl space problems homeowners overlook start as small misses like these.
Why an Experienced Encapsulation Team Makes the Difference
Good encapsulation comes down to judgment: knowing which crawl space needs a sump and which one just needs better gutters, which liner will hold up to service traffic, how big the dehumidifier has to be, and when the right answer is to repair the structure first. That judgment comes from working under a lot of homes.
Level Home Foundation Repair has worked on foundations and crawl spaces across the Tulsa area for over 10 years. Our team encapsulates crawl spaces, installs crawl space drainage systems, and rebuilds damaged floor structures, so one plan can cover the structure, the water, and the air instead of just one of them. That range is the same reason we can match the right process to the right repair on everything from slab homes to pier and beam foundations. Our processes are approved by engineering firms across Texas and Oklahoma, and we have never failed an engineer reinspection.
Every job starts with an honest assessment. If your crawl space needs a drainage fix or a structural repair before it needs encapsulation, we will tell you, and the written scope will spell out exactly what we plan to install and why. You can read what homeowners say about working with us in our customer reviews.
Questions to Ask Any Crawl Space Encapsulation Contractor
Whoever you hire, these questions separate a planned system from a roll of plastic:
- How will you handle water, and does my crawl space need interior drainage or a sump pump? Why or why not?
- How did you size the dehumidifier, and where will it drain?
- What liner will you use on the floor and walls, and how will it be fastened?
- How will the seams, piers, and edges be sealed, and with what?
- Are there gas appliances in my crawl space, and what has to change before the vents are closed?
- Will you leave a termite inspection gap, and should I talk to my pest control company first?
- What happens to the old insulation and plastic?
- Did you check the framing, piers, and sill plates, and does anything need repair first?
- How will I know the system is working after you leave?
A good crawl space encapsulation contractor will have clear answers to every one of them, and the answers will be specific to your home.
What Homeowners Can Handle Themselves
Some crawl space care really is a homeowner job. Keep gutters clean, make sure downspouts carry water well away from the house, keep the crawl space door closed and in good shape, and pick up an inexpensive humidity meter to see what conditions are like. Those habits help any crawl space.
Sealing the crawl space as a system is different. It touches drainage, structure, air quality, and in some homes the safety of your gas appliances, and the cost of a mistake usually gets paid twice. If you are not sure what your crawl space needs, start with an inspection before you buy a single roll of liner. Our complete guide to crawl space repair in Tulsa is a good place to get familiar with the options.
Key Takeaways
- DIY crawl space encapsulation videos show the parts, not the planning. Every crawl space needs its own plan for drainage, materials, sealing, and humidity control.
- Prep matters: debris out, ground raked flat, and a wall liner that is mechanically fastened, not just taped.
- Structure, water sources, mold, and gas appliances get checked before anything is sealed.
- The code sets minimums for the liner and requires a way to ventilate or dry the air. Thicker, reinforced liners and well overlapped, sealed seams hold up better.
- Dehumidifier ratings changed in 2019, so sizing takes current numbers and the real conditions in your crawl space.
- Level Home Foundation Repair encapsulates crawl spaces, installs crawl space drainage, and repairs crawl space structure across Tulsa and northeast Oklahoma.
Frequently Asked Questions
Is DIY crawl space encapsulation worth it?
For most homes it is a risky way to save money. The materials are only part of the job. The value is in the planning: handling water first, sizing the dehumidifier, choosing a liner that will hold up to service traffic, fastening and sealing every edge, and checking for structural damage and gas appliances. Mistakes usually mean paying to remove the system and install it again.
Why does the ground need to be raked flat before the liner goes down?
So the liner can lie flat and seal. Ridges and bumps hold the liner off the ground, put stress on the seams, and become wear points where people crawl, while low spots collect water. Department of Energy guidance calls for removing sharp stones, filling low spots, and smoothing the ground for an even application.
What size dehumidifier does an encapsulated crawl space need?
It depends on the square footage and height of the space, how airtight it is after sealing, how much moisture still comes from the soil and walls, and whether ducts or equipment are in the crawl space. The building code says dehumidification should be sized to the manufacturer’s specifications. Dehumidifier ratings also changed in 2019, so a portable unit rated at 70 pints a day under the old test works out to roughly 40 to 45 pints under the current one.
Do you need a sump pump to encapsulate a crawl space?
Not always. A sump pump or interior drain is needed when liquid water gets into the crawl space, whether from storms, seepage through the walls, or a high water table. If the space stays dry and the exterior drainage is working, it may not need one. That decision should come from an inspection before the liner goes in.
Is it safe to seal crawl space vents?
It can be, when the crawl space is sealed as a complete system with a way to dry the air. The Department of Energy warns that simply sealing vents without addressing the rest can raise moisture levels, and can create a deadly situation if natural draft gas appliances in the crawl space depend on those vents for combustion air. Those appliances have to be dealt with first.
Can you encapsulate over mold or rotted wood?
You should not. The EPA advises cleaning and drying moldy surfaces rather than covering them, and fixing the moisture that caused the mold. Covering rotted joists, sill plates, or failing piers only hides damage that keeps getting worse. Structural repairs and cleanup come first, and then encapsulation protects the repaired space.
Schedule a Free Crawl Space Inspection in Tulsa
If you are thinking about encapsulating your crawl space, or a DIY job is not holding up, schedule a free inspection. Our team will look at the structure, the water, and the air under your home and tell you what it needs and what it does not. You can also read more about crawl space encapsulation in Tulsa, including what the work involves and what affects the price, or compare a vapor barrier and full encapsulation. Financing options are available. Call (918) 361-7787 or contact us online.